The next generation of FUSION Pro Wired Controller has arrived with the launch of the FUSION Pro 3 Wired Controller for Xbox Series X|S (opens in a new tab). Designed to provide gamers pro-level specs at wallet-friendly prices, the FUSION Pro 3 controller offers lots of features enabling gamers to customize their optimal experience. Want to fine tune your new FUSION Pro 3? See tips below to get the most out of your controller.
Firmware Update and User Manual
Ensure your controller has the latest firmware for the best performance. Download the free PowerA Gamer HQ app to check for firmware updates that deliver fixes and performance improvements. Also, take advantage of other features to optimize your controller. The PowerA Gamer HQ app is available to download on your console or your Windows PC via the Microsoft Store.
Note: If this is your first time connecting your FUSION Pro 3 controller to the PowerA Gamer HQ App, you may be asked to execute a one-time firmware update via the Windows version of the app. Please follow the prompts in the app if instructed to do so.
Please click here to be taken to the PowerA Gamer HQ App page on the Microsoft Store: PowerA Gamer HQ App (opens in a new tab)
Need a copy of your user manual? If so, you can download it here: FUSION Pro 3 User Manual PDF (opens in a new tab)
Mapping Your Advanced Gaming Buttons
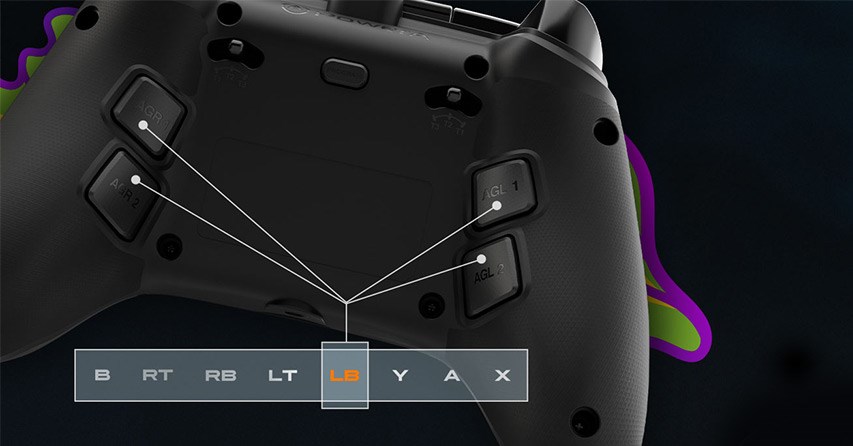
One new feature you’ll notice on the FUSION Pro 3 is the addition of four Advanced Gaming Buttons on the back of the controller. These new AGBs replace the removable Pro Pack from previous generations allowing for a more seamless integration of mappable buttons. One feature we love is that these buttons can be mapped on-the-fly, mid-game. No need to open any software to map the buttons and it really is as simple as 1-2-3.
- Hold the Program Button on the back of the controller for 3 seconds. The LED indicator light on the front of the controller will flash once program mode is activated.
- Select the button you wish to map by pressing it once
- Select the AGB on the back of the controller you wish to map the button command to by pressing it once
Pro Tip: The four AGB buttons on the back of the controller are best used for actions that usually require the user to move their thumbs away from the analog sticks, or your “trigger” fingers leaving the bumpers or analog triggers. Usually, this means remapping the ABXY buttons or the D-PAD to the extra buttons on the back of the controller. AGL1/AGL2 are best used to remap extra functions that you use heavily during gameplay. These buttons generally rest right where your middle finger sits on each side and are easily pressed quickly and comfortably. Remapping this to special weapons or actions you need quick response for in game is best. The AGL3/AGL4 buttons generally rest close to your ring fingers on each hand and are best used to remap features that are important but not used as frequently.
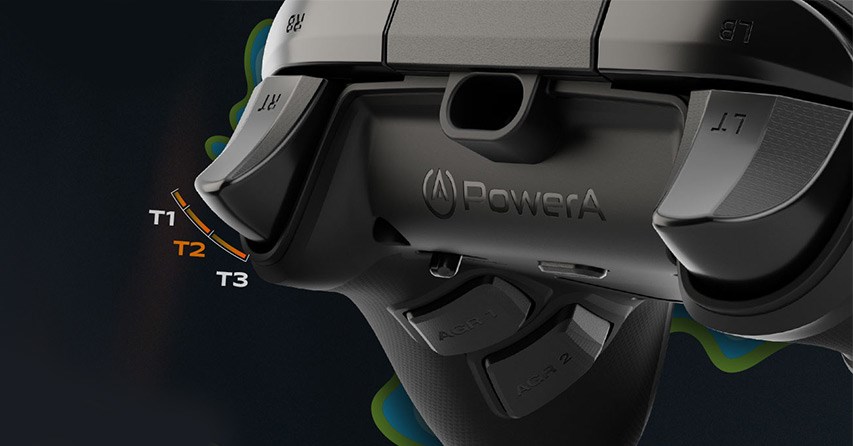
Adjusting Your Trigger Locks
Trigger locks are a great way to adjust the distance of the trigger pull before it activates the input command. This is useful in games like first person shooters and adventure games where allowing for a shorter distance can decrease reaction time for that action. Please note that not all games recognize trigger locks and some games that require a full trigger pull to work properly may not function as intended. For example, racing games that recognize partial trigger pulls for throttle response may go from zero to full speed much faster if trigger locks are activated. Or they may not reach full speed at all. Compatibility varies by game title.
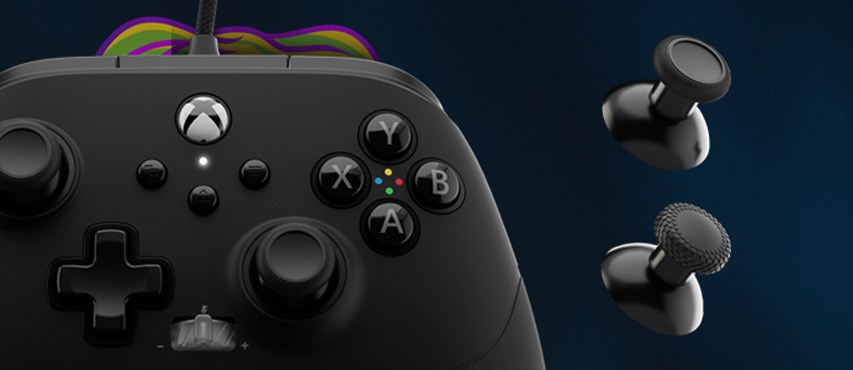
Analog Thumb Stick Options
The Fusion Pro 3 offers several types of analog sticks to suit your play style. Being that the sticks are swappable, you can easily configure the placement to your likings. There is no right or wrong way to use these sticks. However here are some tips to get you started.
Short Concave Analog Sticks
- Two of these sticks are provided and set on the controller as the default options from the factory. These sticks are popular options for everyday gaming and for any type of game.
Tall Concave Analog Stick
- One tall concave stick is provided and is packed in the protective case.
- This stick is more commonly used on the right analog stick module. However, it can be used as a left thumb stick if preferred.
- Some users may notice that the taller sticks may require greater movement to activate an action than shorter sticks. This is simply by nature of using a taller stick, however, the actual dead zone of a shorter or taller stick remains the same in either configuration.
Pro Tip: Using a taller stick can offer more precise movements and could be more ideal for situations that require pinpoint accuracy such as sniping in an FPS.
Tall Convex Analog Stick
- One tall convex analog stick is provided and is packed in the protective case.
- The convex (or domed) shape is advantageous for those who want more precision and prefer a domed surface area.
- This stick is more commonly used on the right analog stick module. However, it can be used as a left thumb stick if preferred.
- Some users may notice that the taller sticks may require greater movement to activate an action than shorter sticks. This is simply by nature of using a taller stick, however, the actual dead zone of a shorter or taller stick remains the same in either configuration.
Optimize Your Experience With The PowerA Gamer HQ App
The PowerA Gamer HQ app features multiple test methods to ensure everything is functioning correctly on the controller. On top of testing buttons, you can also calibrate several inputs to your liking.
You are able to test out analog stick settings…
- look at the sensitivity
- test that all buttons are reacting correctly
- test audio using a headset (sold separately)
- test vibration (both impulse triggers and grip motor vibration)
Keep an eye out for future PowerA Gamer HQ App updates as we regularly add more exciting features to enhance your gaming experience.
Check out the FUSION Pro 3 Wired Controller for Xbox Series X|S (opens in a new tab)